View Models - Bringing Views to Life
Introduction
While XUML serves to describe the design, layout and configuration of a view, the view model describes its data, logic and behavior. The view model makes it possible for a view to do things like respond to user interaction, respond to changes in other views, modify its state or perform actions every frame.View Models in the Scene
Before we break down all the parts of the view model I want to explain how the view models are represented in the unity scene hierarchy. Here is an example of a simple view model that responds to a button click:
View XUML
<ExampleView>
  <UserInterface>
    <Button Text="Play" Click="StartGame" />
  </UserInterface>
  <EventSystem />
</ExampleView>
View Model
public class ExampleView : View
{
    public void StartGame()
    {
        Debug.Log("Play Clicked");
    }
}
If we setup our scene to present the ExampleView the MarkLight editor extension will process the XUML file and generate the following objects in the scene:
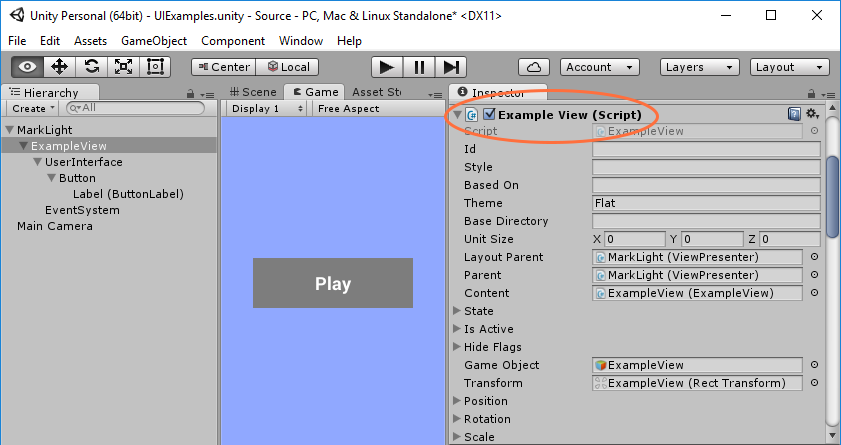
As you can see in the scene hierarchy on the left, the processor has created game objects for the views and arranged them in the hierarchy we've specified in the XUML. On the right you can see that the view object ExampleView has its view model attached as a component.
View Model Declaration
A view model is declared as a class that inherits from the View base class or a subclass thereof, most common being UIView that is used whenever a view resides in a UI canvas. The name of the class is the name you use to refer to the view in XUML. Here is an example how the Label view model is declared:Label.cs
    [ExcludeComponent("ImageComponent")]
    [HideInPresenter]
    public class Label : UIView
    {
As shown in the example you can add class attributes when declaring the view model. These are more advanced options that you don't need to worry about in most cases. Here is a description of what they do:
| Class Attribute | Description |
|---|---|
| HideInPresenter | When specified the view is not shown in the view presenter's main view selection. Used to not clutter up the main view selection with views only intended to be used internally in other views. |
| ExcludeComponent | When encountering a component field in the view the processor automatically adds the component to the view. This attribute tells the processor to not add component associated with the specified field. Used primarily to exclude one graphic component so it can be replaced with another since Unity doesn't allow multiple graphic components to be added to a view. |
| MapViewField | Allows you to map one view field to another on the class level. Usually MapTo is used when mapping fields but in some cases such as when view actions are mapped you'd want to use this instead. |
View Fields
View fields represents the data/configuration/attributes of a view. It can be the text of a label, width of a view, the orientation of list, etc. View fields are declared as class fields on the view model. The name of the field is the name you use to refer to it in XUML.
public class Example : UIView
{
    public string Text;
}
<Example Text="Example Text" />
When programmatically modifying the value of a view field you need to use a generic method called SetValue. This is so the system can be notified of changes and utilize the change handling and binding systems. Example of how to use SetValue:
    SetValue(() => Text, "Test"); // sets Text = "Test" and notifies observers
    SetValue(() => ChildView.Orientation, Orientation.Horizontal);
To avoid having to call SetValue and to make things simpler you can change the view field Text to a dependency field, which is recommended specially if you plan on mapping fields or programmatically setting values.
Dependency Fields
Dependency fields wrap SetValue calls. To create a dependency field simply add an underscore _ to the type in your view field declaration:
public class Example : UIView
{
    public _string Text;
}
You can now set the value of a dependency field through the Value or DirectValue property:
Text.Value = "Test"; // sets value and notifies observers
Text.DirectValue = "Test"; // sets value without notifying observers
Dependency fields makes things more readable and user-friendly. They also ensure that value propagation logic is utilized unless explicitly specified otherwise (DirectValue used).
If you have a custom type that you wish to create a dependency field from you need to declare a dependency field class for your type:
public class _YourType : ViewField<YourType> { }
View References
To reference a child view within your view model you can do so by adding a view field with the same type as the view you want to reference and giving it the same name as the ID you give the view in XUML:
public class Example : UIView
{
    public Label MyLabel;
}
<Example>
    <Label Id="MyLabel" />
</Example>
In XUML you can access fields directly on the Label through the reference:
<Example MyLabel.Text="Label Text" />
This can get a bit verbose and sometimes we want a more descriptive name rather than the generic name of e.g. Label.Text. We can accomplish this through view field mapping explained in a later section.
View Components
To add a unity component to your view object you declare a component field on your view model:
public class Example : UIView
{
    public UnityEngine.UI.Text TextComponent;
}
The example above adds a Unity Text component to the view object. This component can be accessed through XUML as with any other view field:
<Example TextComponent.text="Example Text" />
Just like with view references we might want to access the component fields through less verbose and more descriptive names. See the section on view field mapping for information on how this is done.
View Actions
A view action is an event that can be declared on the view model that other views can attach action handlers to. A view action can be triggered by the view model or by the unity event system (such as when user clicks on a view). A view action is declared as a class field of the type ViewAction on the view model. The name you give the field is the name you refer to the action in XUML:
public class TriggerExample : UIView
{
    public ViewAction MyCustomAction;
}
To trigger the view action you call:
MyCustomAction.Trigger();
MyCustomAction.Trigger(data); // pass data to the handlers
To listen to view actions you declare an action handler method that will be invoked when the action is triggered. The action handler can have parameters that will be injected when the handler is invoked. Here is an example of another view that listens to the view action Example.MyCustomAction:
public class ListenExample : UIView
{
    public void MyCustomActionHandler(Example source, string data)
    {
    }
}
<ListenExample>
    <TriggerExample MyCustomAction="MyCustomActionHandler" />
</ListenExample>
Finally if you want the unity event system to trigger your actions automatically you can name your action one of the following names:
BeginDrag
Cancel
Deselect
Drag
Drop
EndDrag
InitializePotentialDrag
Move
Click
PointerClick
MouseClick
PointerDown
MouseDown
PointerEnter
MouseEnter
PointerExit
MouseExit
PointerUp
MouseUp
Scroll
Select
Submit
UpdateSelected
Doing so makes sure that your action will be triggered when the corresponding unity event occurs. For example if you wish to add a view action that gets triggered when the user clicks on the view, you name the view action Click:
public class TriggerExample : UIView
{
    public ViewAction Click;
}
Mapping View Fields
View field mapping is a way to provide abbreviated and descriptive view fields that maps and refers to view fields that resides in another view or unity component. Example of setting a component field without mapping:
public class Example : UIView
{
    public UnityEngine.UI.Text TextComponent;
}
<Example TextComponent.text="Example Text" />
TextComponent.text is a generic name and doesn't tell us what the text represent and the typing the whole field path is cumbersome. To solve this by declaring a new view field and mapping it to the text component field:
public class Example : UIView
{
    [MapTo("TextComponent.text")]
    public _string GameTitle;

    public UnityEngine.UI.Text TextComponent;
}
We can now access and change the field through XUML and code like this:
GameTitle.Value = "Example Text";
<Example GameTitle="Example Text" />
The standard views relies heavily on dependency fields and view field mapping to make things easy to access and intuitive to use. It's recommended that you do the same, specially if you plan on distributing and re-using your views.
Change Handlers
Change handlers are methods within the view model that are invoked whenever certain view fields are changed. For example UIView relies on change handlers to do layout logic whenever a field affecting the layout has changed (such as width, alignment, margin, etc). To declare a change handler add the attribute ChangeHandler to a view field:
public class Example : UIView
{
    [ChangeHandler("TextChanged")]
    public _string Text;

    public virtual void TextChanged()
    {
        // called once at init and whenever text changes value
    }
}
You can give the change handler any name you want. The postfix Changed is the recommended name standard within the framework. It's also recommended that you make the method virtual so it can be overridden by subclasses that wish to handle the same changes.
Finally if you are mapping fields you can declare the change handler within the MapTo attribute:
    [MapTo("TextComponent.text", "TextChanged")]
    public _string Text;
Initializing a View
To initialize values on the view model you can set the values in the root element in your XUML file:
  public class Example : UIView
  {
      public _string Player;
  }
  <Example Player="Default Player">
  </Example>
If you wish to populate data during runtime or perform certain logic upon initialization you can override the Initialize method. This method gets called once when the scene starts after all the internal initialization has completed.
    public override void Initialize()
    {
        base.Initialize();

        // populate runtime data, do lookups, etc.
    }
If you want to set default values in code you can override SetDefaultValues which gets called after internal initialization is done but before any XUML values are set.
Finally if you wish to perform some initialization logic every time the view gets activated in the scene, you can attach a view action handler to the view action Activated. If the view starts out activated it gets triggered once after the view is initialized.