Data Binding
Introduction
This tutorial will explain what data binding is, the various forms of data binding supported by the MarkLight framework and how to utilize them.Data binding is a mechanism to connect data together and keep it synchronized. It ensures that changes in the data is automatically reflected in the sources bound to the data. It also makes it possible to establish a loose connection between data sources, e.g. a DataGrid can be bound to an external list of data but it doesn't need to know where it comes from nor does it need to know any details about the data model. This is useful when we want to connect data, e.g. from our project's game logic to a more generic UI presentation logic. It enables us to create modular reusable components that can be used in different projects featuring very different data models.
Declaring a Binding in XUML
The default binding in XUML is the two-way binding which can be declared using the following syntax:TargetViewField="{SourceViewField}"
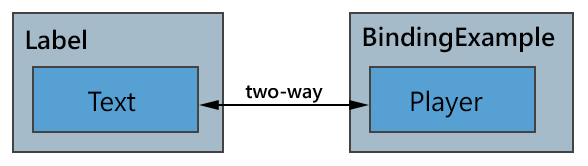
<BindingExample>
    <Label Text="{Player}" />
</BindingExample>
In the example above we have established a two-way data binding between the view fields Label.Text and BindingExample.Player. If one field changes the other is automatically updated. The value initially propagates from SourceViewField to TargetViewField.
To utilize the binding mechanism in code you can set values using the SetValue method:
BindingExample.cs
public class BindingExample : UIView
{
    public string Player;

    public void ChangePlayer()
    {
        SetValue(() => Player, "Player Name"); // changes are propagated to Label.Text
    }
}
To avoid having to use SetValue every time you change a view field value you can change the view field Player into a dependency field. A dependency field wraps the SetValue logic:
public class BindingExample : UIView
{
    public _string Player;

    public void ChangePlayer()
    {
        Player.Value = "Player Name";
    }
}
The syntax is cleaner and the advantages are even more apparent when working with mapped fields. All the standard views in the framework uses dependency fields.
Binding Paths
MarkLight supports nested fields and ID-selectors when specifying source view field in a binding:
<BindingExample>
    <Group>
        <Label Id="Label1" Text="{PlayerName.FirstName}" />
        <Label Text="{Label1.Text}" />
    </Group>
</BindingExample>
The first label binds to a nested field on the parent view model PlayerName.FirstName. The second label uses an ID-selector to bind to the first label's Text field.
Multi Binding
Multi binding is a one-way binding that binds multiple view fields to a single target view field. It's declared using the following syntax:Regular:
TargetViewField="$MethodName({ViewField1}, {ViewField2}, ...)"
Using static method:
TargetViewField="$ViewName.StaticMethodName({ViewField1}, {ViewField2}, ...)"
To create a multi binding we first need a transformation method that either resides in the parent view model or if it's a static method it should reside in the view specified in the binding. The transformation method combines multiple values into one. For this example we create a method that returns the sum of three values:
public class BindingExample : UIView
{
    public _int Value1;
    public _int Value2;
    public _int Value3;

    public int Sum(int a, int b, int c)
    {
        return a + b + c;
    }
}
We can then bind Value1, Value2 and Value3 to a view field like this:
<BindingExample>
    <Label Text="$Sum({Value1}, {Value2}, {Value3})" />
</BindingExample>
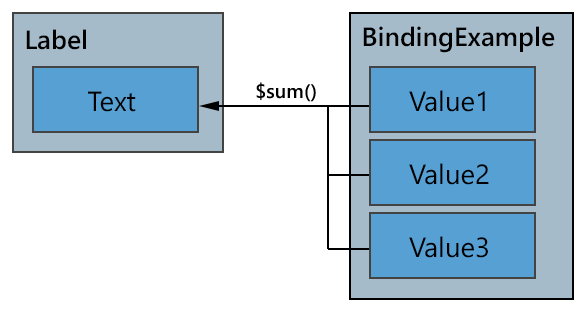
If Value1, Value2 or Value3 changes the Label's text is updated.
Format String Binding
If you want to transform multiple values into a formatted string you can do so by specifying a string containing format items. For example:
<BindingExample>
    <Label Text="Hello {FirstName} {LastName}!" />
</BindingExample>
Which translates to the following C# operation:
Label.Text = String.Format("Hello {0} {1}!", FirstName, LastName);
You can follow the binding path with a format modifier to control things like number of decimals printed:
<BindingExample>
    <Label Text="{Value:0.0} %" />
</BindingExample>
The example above prints out Value with one decimal followed by a percentage sign. It translates to {0.0} in the String.Format string. You can find more information about text formatting options here: String.Format Method.
One-way Binding
If you want the values to only flow in one direction you can specify that the binding is one-way by using the following syntax:
<BindingExample>
    <Label Text="{=Player}" />
</BindingExample>
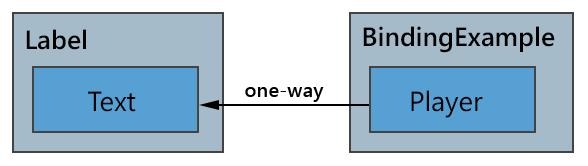
The leading = sign denotes that the binding is one-way. Changes in Player will propagate to the label text but changes in the text won't be propagated back to Player.
Local Binding
You can bind to a local view field using the following syntax:
<BindingExample>
    <Label Text="{#Theme}" />
</BindingExample>

The leading # sign denotes that the following view field resides in the Label.
List Item Binding
Every view contains a view field called Item which is a reference to user-defined item data that is populated by views such as the List and DataGrid. This is used e.g. when creating list item templates that bind to list item data:
<BindingExample>
    <List Items="{Highscores}">
        <ListItem IsTemplate="True" Text="{#Item.Score}" />
    </List>
</BindingExample>
In the above example the List will generate a ListItem for each highscore object in the list Highscores. For each ListItem (and its child views) it will set its Item to the corresponding highscore object. In this example it binds ListItem.Text to the highscore object's Score field.
Negated Binding
When binding to a boolean field we have the option to negate the value by using the following syntax:
<BindingExample>
    <CheckBox Text="Shield Deactivated" IsChecked="{!ShieldActive}" />
</BindingExample>
The leading ! sign denotes that the bound bool value is to be negated before set.
Resource Binding
To bind to a resource in a dictionary you use the following syntax:{@DictionaryName.ResourceKey} or {@ResourceKey}
<BindingExample>
    <Label Text="{@Loc.Greeting}" />
</BindingExample>
See the resource dictionaries tutorial for more information.
Binding Cheat Sheet
| Binding | Example Syntax |
|---|---|
| Two-way Binding |
<Label Text="{Player}" /><Label Text="{PlayerName.FirstName}" /><Label Text="{Label1.Text}" />
|
| One-way Binding | <Label Text="{=Player}" /> |
| Multi Binding |
<Label Text="$Sum({Value1}, {Value2})" /><Label Text="$MyView.StaticMethod({v1}, {v2})" />
|
| Format String |
<Label Text="Hello {FirstName} {LastName}!" /><Label Text="{Progress:0.0} %" /> |
| Local Binding |
<Label Text="{#Theme}" />
|
| List Item Binding |
<Label Text="{#Item.Score}" />
|
| Negated Binding |
<CheckBox IsChecked="{!ShieldActive}" />
|
| Resource Binding |
<Label Text="{@Loc.Greeting}" /><Label Text="{@GameTitle}" />
|
| Negated One-way Local |
<Label Text="{!=#IsActive}" />
|